Introduction
The app is connected with Laravel 5.5 based CMS using REST APIs, the following documentation will guide you through the process to connect the app with your backend. This guide assumes you have some experience in setting up PHP based web applications and Laravel Framework 5.5. Our mobile app supports Android platform, please ensure you have Android setup on your machine before following this tutorial, if you are new, please follow Android Developer Guide
Instructions for setting up server
Following section explains how to setup our Laravel based code on server and configure it properly


-
Server Requirement
The server on which you are going to deploy the backend must fulfill the following requirements:
- PHP >= 7.0.0
- Mysql 5.7
- OpenSSL PHP Extension
- PDO PHP Extension
- Mbstring PHP Extension
- Tokenizer PHP Extension
- XML PHP Extension
-
Deploying Backend
Follow these steps:
- Extract the
weshare.zipon your server - For example if your domain is
http://weshare.comthen you will be able to access the backend ashttp://weshare.com/weshare/public - Use our simple Installation Wizard to setup your server by visiting
/installer - For example,
http://weshare.com/weshare/public/installer - Fill up the form and your server will be configured now
- After you hit the install button, you will also get the url of admin panel
- If you want to make any customization or have any specific requirement, please follow below points, otherwise you can now skip to Mobile App section below
- Extract the
-
Configuration
All the major configuration values you will need to set in .env file which is present in root folder of the accompanied source code. Following are the most important values, you may set other values in .env as well if you have experience and requirment to do so:
- App related - Very Important:
- APP_NAME: Title of your app
- APP_URL: Url of your backend
- Database related - Very Important:
- DB_HOST: Database host, usually it’s localhost
- DB_PORT: Database port, incase of mysql it’s usually 3306
- DB_DATABASE: Database Name
- DB_USERNAME: Database username
- DB_PASSWORD: Database password
- Firebase related - Very Important:
- FIREBASE_ISS: Required to succefully login through FB/Google, Value:
https://securetoken.google.com/<firebase-project-id>. If not setup properly authentication in your app will not work properly.
- FIREBASE_ISS: Required to succefully login through FB/Google, Value:
- Push Notification related:
- ONESIGNAL_APP_ID
- ONESIGNAL_REST_API
- Email Related:
Email integration is provided with Mailgun, Amazon SES, SMTP. For more details refer to https://laravel.com/docs/5.5/mail.
If you are integrating with mailgun, you can simply set following values in .env
- MAILGUN_DOMAIN
- MAILGUN_SECRET
If you need more configuration or advance setting, you can look for keys starting with MAIL_ in .env
-
Database
In accompanied source code you will find a sql file named weshare.sql. Create the database and then import the file in your database.
-
Admin Panel
Admin panel is developed in Angular 7 and shipped in seperate folder. You will need to update app title and base url.
- Open
public/admin/assets/appConfig.json - Update value of
appNameandapiBaseUrl - If you need to make any changes in admin other than this, follow next steps
- Open
weshare-admin.zip, it’s an Angualr 7 based project, nodejs version 8 or above is required - Run
npm installcommand if this your first time - If you are not familiar with Angular 7 we will suggest you to get basic idea from https://angular.io/guide/quickstart
- In
src/app/@core/models/constants.model.tsupdate value ofAPI_BASE_URLandAPP_NAMEvariables - After making the required changes issue a command
ng build --prod - Now angular would have created/updated the
distfolder in root with updated compiled files - You need to copy all the files in
distfolder to you Laravel’spublic/adminfolder. - For example
cp -r weshare-angular/dist/* weshare/public/admin/assumingweshare-angularis your angular project folder andweshareis your laravel project folder
- Open

Instructions for building android mobile app
Following section explains how to connect Andrioid App to server and built it properly


-
Android
Before continuing make sure you have :-
- Firebase Account https://console.firebase.google.com
- Firebase’s Realtime Database is enabled. Use following security rule or use Start in test mode:
{ "rules": { // only authenticated users can read or write to my Firebase ".read": "auth !== null", ".write": "auth !== null" } } - Firebase’s Storage is enabled
- Google or Facebook auth is enabled in Sign-in method in Firebase’s Authentication section
- SHA-1 fingerprint of your machine https://cloud.google.com/solutions/mobile/mobile-firebase-app-engine-flexible#generating_a_sha-1_fingerprint_for_the_app
After following the steps given below make sure you have values of all the following keys with you:
- applicationId
- BASE_URL
- app_name
- web_client_id
- facebook_app_id
- fb_login_protocol_scheme
- ad_unit_id1
- ad_unit_id2
- dynamic_link_domain
- support_email
- onesignal_app_id - follow https://app.onesignal.com/apps/new to add your app and obtain OneSignal app id
You will need to update above values in
app/build.gradleRefactoring- Change the
applicationIdinapp/build.gradle, set this to the package name you want to keep for your application e.g com.weshare - Use the same package name while setting up android app in Firebase in the next step.
- Logo and placeholders used in app are png images which you will find in
app/src/main/res/drawablefolder. - To change the images in app simply replace the images at above mentioned location with your images.
Firebase Setup-
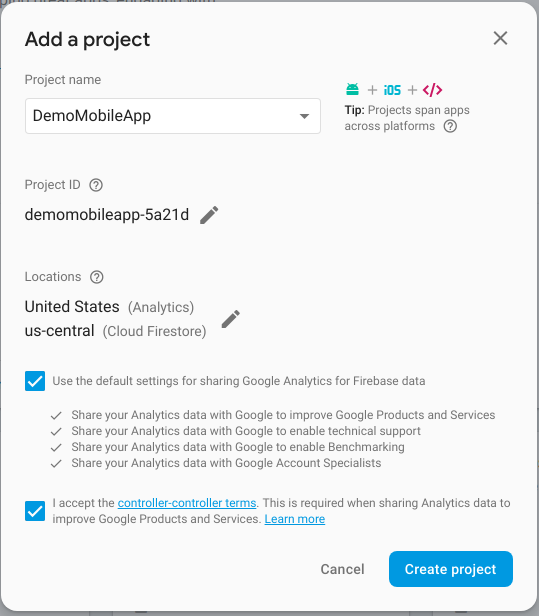
Create a Firebase account or log into an existing account.
-
Click Add project. Follow the remaining setup steps and click Create project.
-
After the wizard provisions your project, click Continue.
-
In the Overview page of your project, click the Settings gear and then click Project settings.
-
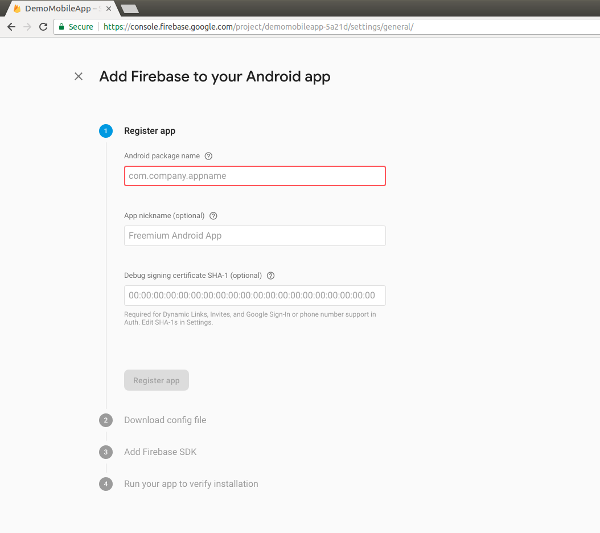
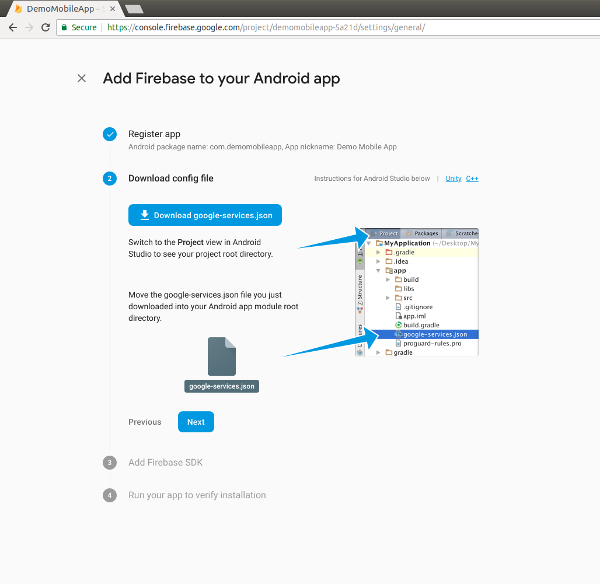
Click Add Firebase to your Android app and follow the wizard
-
In Debug signing certificate SHA-1, enter the SHA-1 value you generated in the previous section.
-
Click Register app.
-
Download the google-services.json file and place it in
appfolder.
-
Click Next in the Download config file section and follow the rest of the steps if required.
-
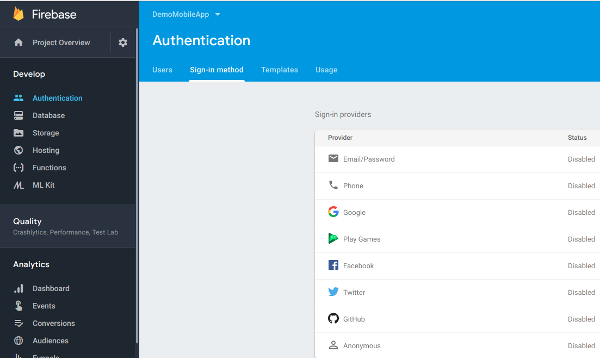
Next click on Authentication and click on Sign-in method
-
Enable Phone Authentication
-
Similarly enable Realtime Database and Storage from side menu.
Setup Onesignal- Go to https://onesignal.com/ signup and create an app
- Add
server keyandsender idfrom firebase console(Cloud messaging under project settings) - You’ll get
onesignal app id
Setup AdMob- Go to https://admob.google.com/home/ signup and create an app
- Create two Banner Ads and copy admob_appid and both banner ids
- Place
ad_unit_id1andad_unit_id2in app/build.gradle - Place
admob_app_idin AndroidManifest.xml file. You’ll findAPPLICATION_IDmeta-data in end of the file, fill in its value attribute.
ConfigurationandTheming- Open
app/build.gradle, you need to edit/add values in respective fields indefaultConfigunderandroid - Fill in
applicationIdwith your package name which you registered on firebase console - Fill in
app_nameandsupport_emailwith your desired app name and support email - For notifications follow https://app.onesignal.com/apps/new to add your app and obtain OneSignal app id which will be used in
onesignal_app_idundermanifestPlaceholders. -
We provide scope for customization of following values:
resValue 'color', "colorPrimary", "#2196F3"
resValue 'color', "colorPrimaryDark", "#1976D2"
resValue 'color', "colorAccent", "#1A237E"